GizmoBench guides
8 Step Sudoku Solving Technique Ladder: Exact Order and Two Week Plan
Most Sudoku puzzles fall to six techniques applied in order: scanning and crosshatching, full house, naked single, hidden single, locked candidates, and naked or hidden pairs. Advanced patterns like X-Wing, Swordfish, and coloring only come into play once that first layer stalls, and they solve a much smaller share of puzzles than beginners expect. Learn the order below, run it as a routine, and most Sudoku grids stop feeling mysterious within a couple of weeks.
TL;DR:
- Most puzzles are solvable using basic techniques like scanning, full house, naked and hidden singles, and locked candidates, before advanced patterns are necessary.
- Pencil marks should only be added after simple scans stall, and must be updated immediately after each new placement to avoid errors.
- Advanced patterns such as X-Wing, Swordfish, and jellyfish are rare solutions used only after simpler methods, with most puzzles resolved before their application.
- Consistently re-scanning and verifying your rule justification for each placement prevents guesswork and maintains a logical solving process.
- Moving sequentially through the solving ladder, from scanning to subsets to advanced patterns, guarantees efficiency and helps avoid unnecessary complexity.
Table of Contents
- Core Sudoku Solving Techniques: Scanning, Singles, and Full Houses
- When and How to Use Pencil Marks for Sudoku Candidates
- Locked Candidates, Pointing, Claiming, and Naked or Hidden Subsets
- Advanced Sudoku Patterns: X-Wing, Swordfish, Y-Wing, and Coloring
- The Sudoku Technique Ladder: Your Repeatable Solving Routine
- Common Sudoku Mistakes and How to Fix Them
- Practice Progression: A Two-Week Plan to Level Up
- Fish Patterns Beyond Swordfish: Jellyfish and Larger Grids
- Forcing Chains: When Straightforward Logic Runs Out
- How to Tell the Difference Between Logic and Guessing
- Sources
Core Sudoku Solving Techniques: Scanning, Singles, and Full Houses
Every solid solve starts the same way: scan before you write anything down. This sequence, moving from direct placements toward more advanced eliminations, is exactly how Sudoku solving methods are meant to progress, and skipping ahead to notation usually just slows you down.
Crosshatching means picking one digit, say 7, and scanning across three rows or columns at once to see which box still needs it. You mentally cross out cells that already share a row, column, or box with a 7 until only one candidate cell remains. It is the fastest elimination in the game because it needs no pencil marks at all.
A full house happens when a row, column, or box has eight of its nine cells filled. The ninth is automatic. It sounds trivial, but scanning for full houses first clears easy squares before you waste time on harder logic.
A naked single is a cell where only one digit can possibly fit, based on what already exists in its row, column, and box. A hidden single is different: a digit that can only go in one cell of a unit, even though that cell still looks open to two or three other digits at first glance.
- Full house: last empty cell in a nearly complete unit.
- Naked single: one candidate remains for a specific cell.
- Hidden single: one cell remains for a specific digit within a unit.
- Crosshatch: scan digit by digit across three aligned boxes.
Run this pass first, and re-scan the whole grid after every single placement. A new single often unlocks another one instantly.
When and How to Use Pencil Marks for Sudoku Candidates
Pencil marks earn their place once scanning stalls, not before. Adding candidates to every cell on move one buries you in numbers you don’t need yet. A disciplined routine, scan for singles, add notes only when necessary, then move into intersection and subset logic, is enough to solve most puzzles without ever guessing, according to a constraint-based analysis of Sudoku solving methods.
- Add candidates only to cells where scanning alone can’t decide a value.
- Write them small, in a fixed corner order (1 to 9, left to right, top to bottom), so your eye reads them the same way every time.
- Erase or update candidates immediately after every placement in that row, column, and box.
- Reserve candidates for cells you’ll revisit for pointing, claiming, or pair logic.
Digital solvers clear invalid candidates automatically, which is convenient, but it can also make you dependent on the tool instead of the scanning skill. Paper notes force you to update manually, which builds the habit faster even though it’s slower at first.
Pro Tip: Keep a running practice log of grids you solved and which technique unlocked the breakthrough. GizmoBench’s Online Notepad saves text right in your browser, so you can jot candidate lists or track patterns without opening a new document every session.
Locked Candidates, Pointing, Claiming, and Naked or Hidden Subsets
Once your grid has enough candidates written in, intersection logic starts paying off. These eliminations rely on the fact that a box and a line (row or column) share exactly three cells, and constraints in one direction can lock out possibilities in the other. The Sudoku Assistant’s technique library catalogs these patterns with worked examples if you want to see them applied cell by cell.
- Pointing pair or triple: if a candidate appears only in two or three cells of a box, and those cells all sit in the same row or column, you can eliminate that candidate from the rest of that row or column.
- Claiming: the reverse case, if a candidate in a row or column only appears within one box, you can eliminate it from the other cells of that box.
- Naked pair or triple: two or three cells in a unit share exactly the same two or three candidates between them. No other cell in that unit can hold those digits.
- Hidden pair or triple: two or three candidates appear in only two or three cells of a unit, even if those cells still show other candidates too. Strip the extra candidates from those cells.
These patterns tend to show up once a grid is roughly a third to half filled, when candidate lists have shrunk enough to reveal the overlaps. Look for them right after your singles pass runs dry.
Advanced Sudoku Patterns: X-Wing, Swordfish, Y-Wing, and Coloring
Advanced pattern methods are the last resort, not the first move. If your grid still has open cells after singles, locked candidates, and subsets, these techniques target specific candidate shapes across the whole board rather than a single unit.
An X-Wing appears when a candidate occupies exactly two cells in each of two rows, and those four cells align into two shared columns, forming a rectangle. That alignment lets you eliminate the candidate from every other cell in those two columns (or rows, if the pattern runs the other way).
A Swordfish extends the same logic to three rows and three columns instead of two. It’s rarer and takes longer to spot, so most solvers only hunt for it once X-Wing searches come up empty.
- Y-Wing (or XY-Wing): three cells, each holding exactly two candidates, chained together so one candidate can be eliminated from a cell that sees both endpoints.
- Simple coloring: assigning two alternating colors to a candidate’s occurrences across a chain of linked cells, then eliminating cells that see both colors.
The analysis of stepwise Sudoku methods frames this as a ladder: master singles and scanning first, then subsets and locked candidates, and only then move into fish and chain patterns. Cheap eliminations should always come before expensive pattern searches, since a five-minute scan often resolves what looked like an advanced-pattern puzzle.
The Sudoku Technique Ladder: Your Repeatable Solving Routine
Following the same order every time removes the guesswork about what to try next. This is the routine to run on every puzzle, from easy to hard:
- Scan for full houses (units one cell from complete).
- Scan for naked singles across the whole grid.
- Scan for hidden singles, digit by digit.
- Run digit-by-digit crosshatching in boxes that resist the first three passes.
- Add candidates selectively to the cells still unresolved.
- Search for locked candidates (pointing and claiming).
- Search for naked and hidden pairs, triples, and quads.
- Move to advanced patterns only if steps 1 through 7 leave the grid stuck.
Re-scan the entire grid immediately after every placement. This single habit, more than any specific technique, is what separates fast, error-free solvers from people who stall out on medium puzzles. If a puzzle still resists after a full pass through step 8, set it aside. Coming back after a break often reveals a pattern your eyes missed the first time.
Common Sudoku Mistakes and How to Fix Them
Guessing is the single biggest habit that breaks a logical solve. If you can’t point to the specific rule that justifies a placement, you’re guessing, and one wrong guess can cascade into a grid that looks solvable but isn’t.
Stale pencil marks cause a huge share of avoidable errors. Strong solvers consistently flag outdated notes, not puzzle difficulty, as the real barrier for people stuck below hard-level grids, per beginner-focused Sudoku coaching from The New York Times. Update every affected cell’s candidates the moment you place a digit, not at the end of the pass.
- Stuck? Re-scan every digit 1 through 9 across the whole grid before touching notes.
- Check for hidden singles you may have skipped during a faster first pass.
- Review your candidate lists for pairs or locked-candidate opportunities you missed.
Pro Tip: If a puzzle feels stuck, physically cover half the grid and re-scan just that half. Isolating a smaller region often surfaces a hidden single your eyes glossed over on the full board.
Practice Progression: A Two-Week Plan to Level Up
A short, structured drill schedule moves you from scanning to your first advanced pattern faster than solving random puzzles at random difficulty. Beginner guides consistently frame Sudoku learning as a level-based progression, and that structure works better than jumping straight to hard puzzles.
Spend the first week on easy and medium grids, timing yourself on how fast you clear singles and full houses. Add one candidate-heavy medium puzzle daily in week two, then attempt exactly one X-Wing hunt per session once subsets feel automatic.
- Day 1 to 3: digit-focused scanning drills, no pencil marks allowed.
- Day 4 to 7: timed singles pass on medium puzzles, aiming to shave seconds off each attempt.
- Day 8 to 11: candidate cleanup drills, forcing yourself to update every note after each placement.
- Day 12 to 14: one full puzzle per day hunting specifically for locked candidates, then a single X-Wing attempt.
For random drill seeds or grouping practice partners, GizmoBench’s Random Team Generator works well if you’re running a Sudoku practice group and need to split people into pairs. All of these run directly in your browser with no account required, though not every advanced feature across the catalog is free indefinitely.
Fish Patterns Beyond Swordfish: Jellyfish and Larger Grids
Jellyfish extends the X-Wing and Swordfish logic one step further, to four rows and four columns instead of two or three. A candidate that appears in exactly four cells across four rows, all confined to the same four columns, lets you eliminate that candidate everywhere else in those columns.
Jellyfish patterns are rare in practice. Most published puzzles, even ones labeled “hard,” resolve through singles, subsets, and X-Wing alone. Swordfish already stretches most solvers’ patience, since spotting a valid three-by-three alignment by eye takes real practice. Jellyfish demands scanning four full rows or columns simultaneously while tracking which cells share the pattern, which is why most human solvers reach for a solving aid rather than hunting for it manually.
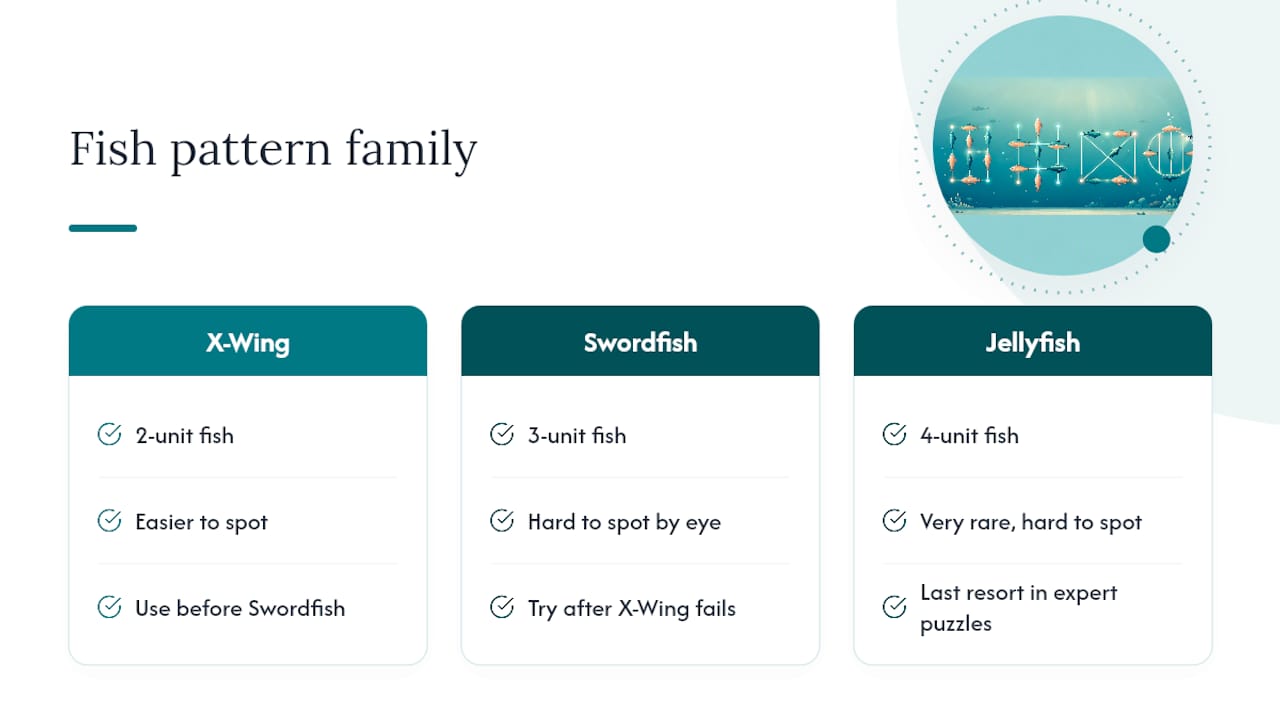
The pattern matters more for understanding the underlying logic than for everyday solving. Fish patterns are really one family: X-Wing is the two-unit case, Swordfish the three-unit case, Jellyfish the four-unit case. Recognizing that family relationship helps the pattern click faster once you see your first successful X-Wing elimination. If you’re working through an expert-rated puzzle and locked candidates plus subsets and X-Wing have all failed, a Jellyfish search is a reasonable next step, but treat it as a last resort. It rarely gets used before that point, and hunting for it prematurely wastes far more time than it saves.
Forcing Chains: When Straightforward Logic Runs Out
A forcing chain tests what happens if you tentatively assign a candidate to a cell, then follows the logical consequences through linked cells until either a contradiction appears or the same conclusion holds no matter which branch you follow. If both branches of a chain force the same digit into a different cell, that digit is confirmed, even though you never used direct scanning to get there.

This differs from guessing in one crucial way: a forcing chain follows strict logical implication at every step, and if either branch leads to a contradiction (two cells needing the same digit in a shared unit, for instance), the other branch must be correct. Simple coloring, mentioned earlier as a candidate-elimination shortcut, is really a basic form of chain reasoning, tracking two possible states across a linked set of cells.
Chains get long and hard to track by hand, which is why most solvers reach for them only on genuinely hard or expert puzzles where X-Wing, Swordfish, and pair logic have all been exhausted. Writing the chain out, cell by cell, on paper or in a notes app, helps more than trying to hold it in your head. A four-link chain is manageable mentally; anything past six or seven links usually needs to be tracked visually to avoid losing your place.
Chains are also where solvers most often make silent logical errors, mistaking a coincidental pattern for a genuine forcing relationship. Double-check the contradiction at the end of each branch before committing to the placement it implies.
How to Tell the Difference Between Logic and Guessing
The clearest test: can you name the specific rule that justifies your next placement? If the answer is “it looked right” or “there was nothing else in that row,” you’re guessing, even if you happen to be correct.
A disciplined solve cycle, re-scanning the full grid immediately after every change, is what keeps guesswork from creeping in. Constraint-based analysis of Sudoku solving confirms that following scan, note, eliminate, re-scan in strict order solves the overwhelming majority of standard puzzles without ever needing a guess. If you find yourself reaching for a guess, it usually means you skipped a step in the ladder rather than that the puzzle genuinely requires one.
A useful habit for catching yourself: before writing any digit, silently state the technique name you’re using. “Hidden single in row 4.” “Pointing pair eliminates 6 from box 7.” If you can’t name it, stop and re-scan instead of committing the digit. This single check, forcing a verbal justification, catches most accidental guesses before they cascade into an unsolvable grid ten moves later.
Puzzles that seem to demand guessing almost always have one overlooked hidden single or an outdated pencil mark sitting a few cells away. Go back to step one of the ladder before assuming the puzzle needs a technique you haven’t learned yet.
Sources
For worked examples of pointing, claiming, and subset logic, the Sudoku Assistant technique library covers roughly 15 pattern varieties in detail. Interactive pattern libraries covering X-Wing and Swordfish visually are also worth studying once basic techniques feel automatic.